
Intro
Discover the ultimate tile underlayment solution with Hardie-Backer Board. Learn how this durable, water-resistant cement board provides a solid foundation for tile installations, reducing the risk of cracks and water damage. Explore its benefits, features, and installation tips, and find out why its the top choice for tile professionals and DIYers alike.
The world of tile installation can be a complex and daunting task, especially when it comes to ensuring a stable and durable underlayment. One of the most popular and reliable solutions on the market is the Hardie-Backer board. In this article, we will delve into the world of Hardie-Backer boards, exploring their benefits, uses, and installation process.
The Importance of a Reliable Underlayment
When it comes to tile installation, a reliable underlayment is crucial to ensure a stable and long-lasting finish. A good underlayment provides a smooth surface for tile installation, prevents water damage, and reduces the risk of cracks and unevenness. Hardie-Backer boards have become a go-to solution for many professionals and DIYers due to their exceptional performance and durability.
What is Hardie-Backer Board?
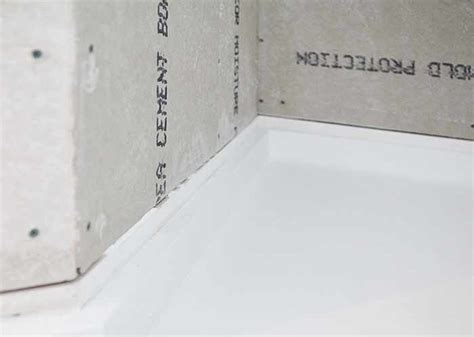
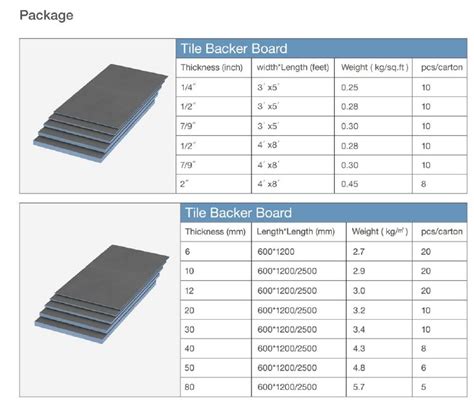
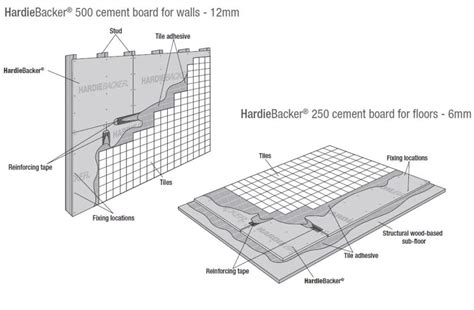
Hardie-Backer board is a type of cement-based underlayment board designed specifically for tile installation. It is made from a combination of cement, sand, and cellulose fibers, which provides exceptional strength, durability, and water resistance. The board is available in various thicknesses and sizes, making it suitable for a wide range of applications.
Benefits of Using Hardie-Backer Board
There are several benefits to using Hardie-Backer board as your tile underlayment solution. Some of the most notable advantages include:
- Water Resistance: Hardie-Backer board is designed to withstand exposure to water, making it an ideal solution for areas prone to moisture, such as bathrooms and kitchens.
- Durability: The board is made from a combination of cement and cellulose fibers, which provides exceptional strength and durability.
- Easy to Install: Hardie-Backer board is relatively easy to install, even for DIYers with limited experience.
- Cost-Effective: Compared to other underlayment solutions, Hardie-Backer board is a cost-effective option.
Uses for Hardie-Backer Board
Hardie-Backer board is a versatile underlayment solution that can be used in a variety of applications, including:
- Tile Installation: Hardie-Backer board is specifically designed for tile installation and provides a smooth surface for tile adhesion.
- Bathroom and Kitchen Renovations: The board's water-resistant properties make it an ideal solution for areas prone to moisture.
- Flooring Underlayment: Hardie-Backer board can be used as a flooring underlayment for a variety of flooring types, including tile, hardwood, and laminate.
Installation Process
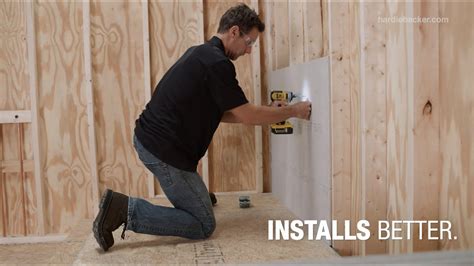
Installing Hardie-Backer board is a relatively straightforward process that can be completed with a few basic tools. Here's a step-by-step guide to get you started:
- Prepare the Subfloor: Ensure the subfloor is clean, dry, and free from any debris or old adhesives.
- Measure and Cut the Board: Measure the area where you will be installing the Hardie-Backer board and cut it to size using a circular saw or utility knife.
- Apply Adhesive: Apply a thin layer of adhesive to the subfloor, following the manufacturer's instructions.
- Install the Board: Place the Hardie-Backer board onto the adhesive, ensuring it is centered and secure.
- Secure the Board: Use screws or nails to secure the board to the subfloor, spacing them 6-8 inches apart.
Tips and Tricks
Here are a few tips and tricks to keep in mind when working with Hardie-Backer board:
- Use the Right Adhesive: Ensure you are using the correct adhesive for your specific application.
- Follow Manufacturer's Instructions: Always follow the manufacturer's instructions for installation and maintenance.
- Use a Level: Ensure the subfloor is level and plumb before installing the Hardie-Backer board.
Conclusion
Hardie-Backer board is a reliable and durable underlayment solution that provides a smooth surface for tile installation. With its water-resistant properties, ease of installation, and cost-effectiveness, it's no wonder why Hardie-Backer board has become a go-to solution for many professionals and DIYers. By following the installation process and tips outlined in this article, you can ensure a successful and long-lasting tile installation.
We hope you found this article informative and helpful. If you have any questions or comments, please feel free to share them below.
What is the recommended thickness for Hardie-Backer board?
+The recommended thickness for Hardie-Backer board depends on the specific application. For most tile installations, a 1/4 inch thickness is sufficient. However, for areas prone to heavy foot traffic or moisture, a 1/2 inch thickness may be required.
Can I use Hardie-Backer board in areas with high humidity?
+Yes, Hardie-Backer board is designed to withstand exposure to moisture and humidity. However, it's essential to ensure the board is properly sealed and installed to prevent water damage.
Can I use Hardie-Backer board as a flooring underlayment?
+Yes, Hardie-Backer board can be used as a flooring underlayment for a variety of flooring types, including tile, hardwood, and laminate. However, it's essential to ensure the board is properly installed and sealed to prevent damage.